cs249r 嵌入式机器学习
TinyML基础
这里所强调的TinyML基础实际上大部分是机器学习、深度学习和tensorflow的相关内容,因此并不需要花太多重点,可能比较困难的地方在于tensorflow的学习。
TinyML部署
实验设备
cs249r的实验设备要求的是Arduino的微控制器和一系列套件,因为自身带有很多传感器(尽管在性能上略有欠缺),可以方便的用于做各种实验。可惜我手边只有一块ESP-S3,而人家的实验设备总体要上百元,实在有点负担不起,考虑到ESP也能胜任绝大多数工作,所以还是决定使用ESP32来实现实验中的功能。
简介和相关额外知识
这部分主要是在描述深度学习推理在嵌入式设备上的相关挑战以及对嵌入式设备的基本介绍,整体上没有太多重点和难度,所以一笔带过。
嵌入式机器学习框架——TFLM
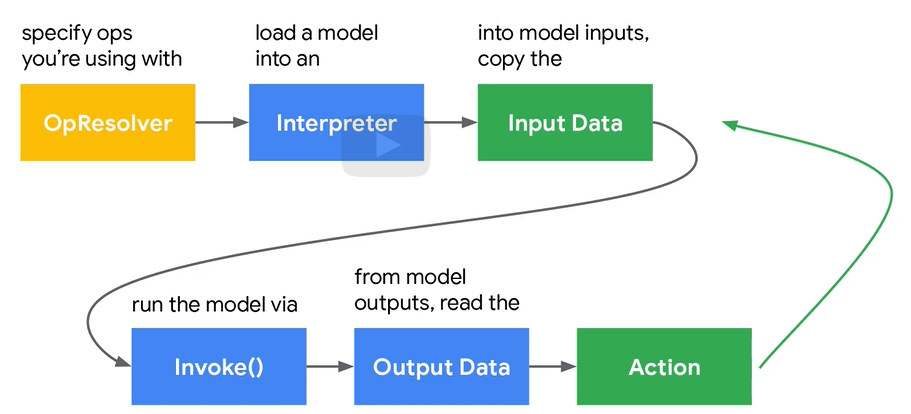
要注意的一点是,TFLM具有以下特征
- 不使用动态分配(内存太小容易炸)
- 没有使用标准C/C++库
- 不依赖特定的OS,可以在裸金属上运行
- 便携和跨系统
关于TFLM中的API调用可以简单的通过其提供的hello world.ino中学习:
#include <TensorFlowLite_ESP32.h>
#include "tensorflow/lite/micro/all_ops_resolver.h"
#include "tensorflow/lite/micro/micro_error_reporter.h"
#include "tensorflow/lite/micro/micro_interpreter.h"
#include "tensorflow/lite/micro/system_setup.h"
#include "tensorflow/lite/schema/schema_generated.h"
#include "main_functions.h"
#include "model.h"
#include "constants.h"
#include "output_handler.h"
// Globals, used for compatibility with Arduino-style sketches.
namespace {
tflite::ErrorReporter* error_reporter = nullptr;
const tflite::Model* model = nullptr;
tflite::MicroInterpreter* interpreter = nullptr;
TfLiteTensor* input = nullptr;
TfLiteTensor* output = nullptr;
int inference_count = 0;
constexpr int kTensorArenaSize = 2000;
uint8_t tensor_arena[kTensorArenaSize];
} // namespace
// The name of this function is important for Arduino compatibility.
void setup() {
// Set up logging. Google style is to avoid globals or statics because of
// lifetime uncertainty, but since this has a trivial destructor it's okay.
// NOLINTNEXTLINE(runtime-global-variables)
static tflite::MicroErrorReporter micro_error_reporter;
error_reporter = µ_error_reporter;
// Map the model into a usable data structure. This doesn't involve any
// copying or parsing, it's a very lightweight operation.
model = tflite::GetModel(g_model);
if (model->version() != TFLITE_SCHEMA_VERSION) {
TF_LITE_REPORT_ERROR(error_reporter,
"Model provided is schema version %d not equal "
"to supported version %d.",
model->version(), TFLITE_SCHEMA_VERSION);
return;
}
// This pulls in all the operation implementations we need.
// NOLINTNEXTLINE(runtime-global-variables)
static tflite::AllOpsResolver resolver;
// Build an interpreter to run the model with.
static tflite::MicroInterpreter static_interpreter(
model, resolver, tensor_arena, kTensorArenaSize, error_reporter);
interpreter = &static_interpreter;
// Allocate memory from the tensor_arena for the model's tensors.
TfLiteStatus allocate_status = interpreter->AllocateTensors();
if (allocate_status != kTfLiteOk) {
TF_LITE_REPORT_ERROR(error_reporter, "AllocateTensors() failed");
return;
}
// Obtain pointers to the model's input and output tensors.
input = interpreter->input(0);
output = interpreter->output(0);
// Keep track of how many inferences we have performed.
inference_count = 0;
}
// The name of this function is important for Arduino compatibility.
void loop() {
// Calculate an x value to feed into the model. We compare the current
// inference_count to the number of inferences per cycle to determine
// our position within the range of possible x values the model was
// trained on, and use this to calculate a value.
float position = static_cast<float>(inference_count) /
static_cast<float>(kInferencesPerCycle);
float x = position * kXrange;
// Quantize the input from floating-point to integer
int8_t x_quantized = x / input->params.scale + input->params.zero_point;
// Place the quantized input in the model's input tensor
input->data.int8[0] = x_quantized;
// Run inference, and report any error
TfLiteStatus invoke_status = interpreter->Invoke();
if (invoke_status != kTfLiteOk) {
TF_LITE_REPORT_ERROR(error_reporter, "Invoke failed on x: %f\n",
static_cast<double>(x));
return;
}
// Obtain the quantized output from model's output tensor
int8_t y_quantized = output->data.int8[0];
// Dequantize the output from integer to floating-point
float y = (y_quantized - output->params.zero_point) * output->params.scale;
// Output the results. A custom HandleOutput function can be implemented
// for each supported hardware target.
HandleOutput(error_reporter, x, y);
// Increment the inference_counter, and reset it if we have reached
// the total number per cycle
inference_count += 1;
if (inference_count >= kInferencesPerCycle) inference_count = 0;
}
解释器interpreter的初始化需要如下参数:
//outside the function
tflite::MicroInterpreter* interpreter = nullptr;
//setup()
static tflite::MicroInterpreter static_interpreter(model, resolver, tensor_arena, kTensorArenaSize, error_reporter);
interpreter = &static_interpreter;
对于模型的存储,我们通常使用序列化来帮助存储模型以在不同地方使用,其中最常用的就是json,但是在TML中我们使用FlatBuffer。因为其对内存非常友好、而且不需要过多的库依赖和操作系统支持,以下是FlatBuffer存储数据的示例:
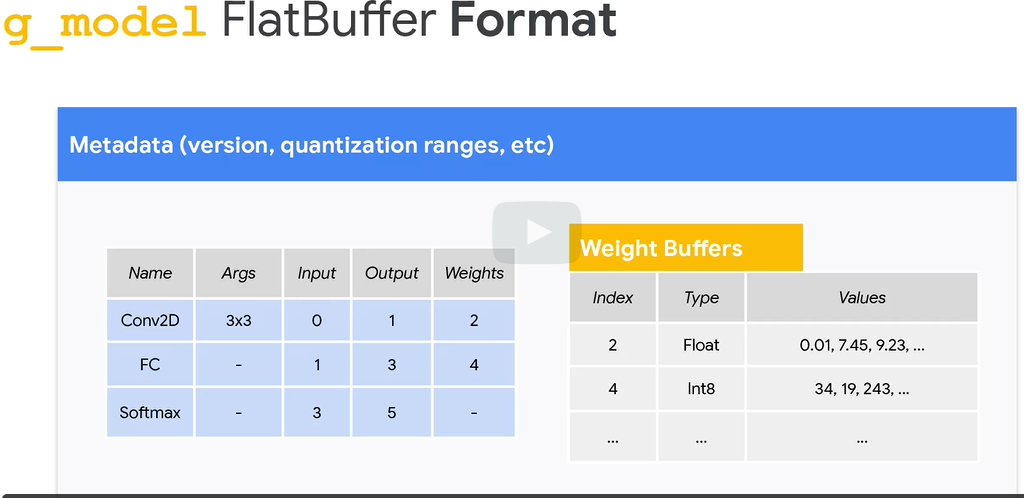
其包含了操作、参数和外部参数等一系列数据。那么如何修改模型参数?课堂上提供了如下的python代码:
def load_model_from_file(model_filename):
	with open(model_filename, "rb") as file:
		buffer_data = file.read()
	model_obj = Model.Model.GetRootAsModel(buffer_data, 0)
	model = Model.ModelT.InitFromObj(model_obj)
	return model

def save_model_to_file(model, model_filename):
	builder = flatbuffers.Builder(1024)
	model_offset = model.Pack(builder)
    builder.Finish(model_offset, file_identifier=b'TFL3')
    model_data = builder.Output()
    with open(model_filename, 'wb') as out_file:
        out_file.write(model_data)
model = load_model_from_file('model.tflite')
for buffer in model.buffers:
	if buffer.data is not None and len(buffer.data) > 1024:
		original_weights = np.frombuffer(buffer.data,dtype=np.float32)
        munged_weights = np .round (original_weights * (1/0.02)) *0.02
    save_model_to_file(model,'model_modified.tflite ')

# https://colab.research.google.com/github/tinyMLx/colabs/blob/master/4-4-8-Flatbuffers.ipynb
在推理过程中,TFLM需要使用内存空间进行中间变量的存储等一系列数据存储

因此会占用一定的内存空间,由于TFLM是基于裸金属的,可以不适用OS进行动态的内存分配,所以TFLM所提供的方案是用户申请堆空间然后交给interpreter自己组织:
constexpr int kTensorArenaSize = 2000;
uint8_t tensor_arena[kTensorArenaSize];
其次就是所有的过程只有这一次内存分配,之后不再进行任何的内存分配以防止段错误。由于arena的大小设置是一个相当复杂的问题,在具体使用时很难计算出具体的大小,因此建议尽可能地使用大空间并逐渐减少。
TFLM的操作符解析器是另一部分重要内容,如下图
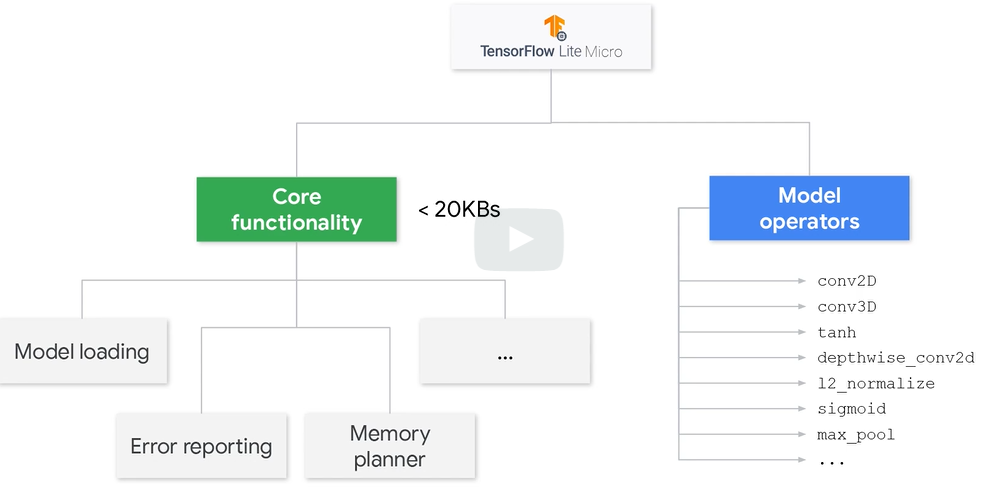
TFLM中一部分由核心的函数组成,剩余的大部分都是操作。由于在推理过程中绝大多数的操作并不会被使用,因此可以通过删除其中不必要的操作来节省空间。

通过只采用特定的操作进行推理可以在一定程度上缩减所使用的空间
模型转化
模型转化分两步走,先将普通模型转化成TFL模型,之后再将其转化为TFLM模型
TF模型->TFL模型
https://colab.research.google.com/github/tinyMLx/colabs/blob/master/3-5-13-PretrainedModel.ipynb
这里特指将模型从tflite模型到二进程cc模型的一个过程,整体流程并不复杂:
!apt-get update && apt-get -qq install xxd
MODEL_TFLITE = 'KWS_yes_no.tflite'
MODEL_TFLITE_MICRO = 'KWS_yes_no.cc'
!xxd -i {MODEL_TFLITE} > {MODEL_TFLITE_MICRO}
REPLACE_TEXT = MODEL_TFLITE.replace('/', '_').replace('.', '_')
!sed -i 's/'{REPLACE_TEXT}'/g_model/g' {MODEL_TFLITE_MICRO}
关键词识别 示例
整体的流程如下,有过ML经验的应该不需要多说明了:

在主循环中要完成的事情如下:

在初始化过程中需要完成的事情如下:
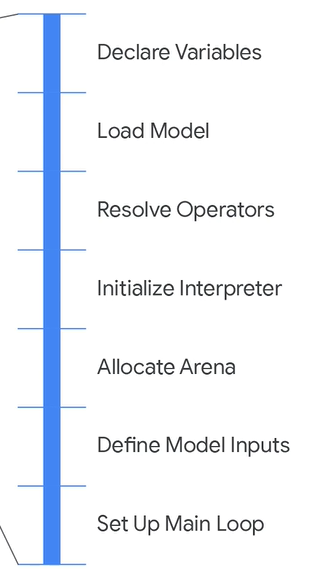
首先是通过代码实现初始化的流程。这部分主要是通过代码实现了,后续可以考虑参考源代码。前面提到了主循环中需要做的事情,首先是对数据的预处理,即进行音频的获取和特征的提取,这里是每次获取30ms的音频将其放入buffer中,待完成后进行FFT处理成频谱图以用于卷积神经网络
推理阶段主要是将buffer中的数据拷贝到模型输入数组并进行模型处理,在此过程中有一点要注意的是
上述代码并没有使用memcpy而是使用了for循环进行拷贝,这一操作的原因还是为了减少基础库的使用来节省空间。
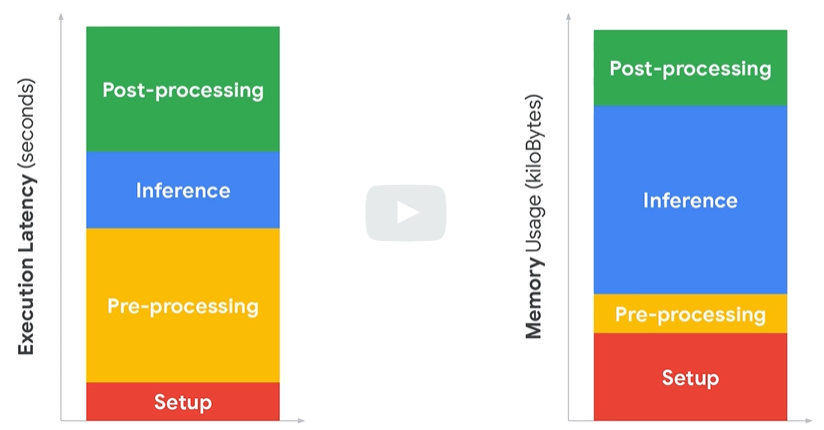
推理阶段完成之后,并不是简单的进行结果的输出,举一个例子,假设我们需要识别up、down、no、yes这些单词,如果程序如同上述只进行切片检测就输出结果,那么很容易就会出现upward、downward,notable这些词触发,因此还需要后处理阶段来增加系统的鲁棒性。为了提高鲁棒性,这里我们使用对多个切片进行识别并最后进行整合判断(获得多个结果并进行平均值处理)
**总结:**KWS是一个端到端的应用例子,在进行这种端到端的应用实现时,实际上需要考虑到方方面面而不仅仅是构建一个简单运行的模型,从屏幕录播所提供的代码可以看出其中随处可见的错误检测。同时,将整体流程分为多个部分以方便进行优化和处理也是需要着重研究的地方。
数据工程
数据工程是监督学习的一个重要方面,需要对数据集进行规范,以及收集和处理数据的程序。当然,这涉及到定义哪些特征,数据的结构(例如,图像、时间序列、行图元)以及其他特征。
进行数据工程所需要考虑的一些内容包括:数据来源、与实际环境的差异、标签和转移。唯有做好以上的这些内容才能保证整个系统不会出现较大的问题。由于这门课并不是教这个的,所以也不是什么大重点。
视觉唤醒 示例
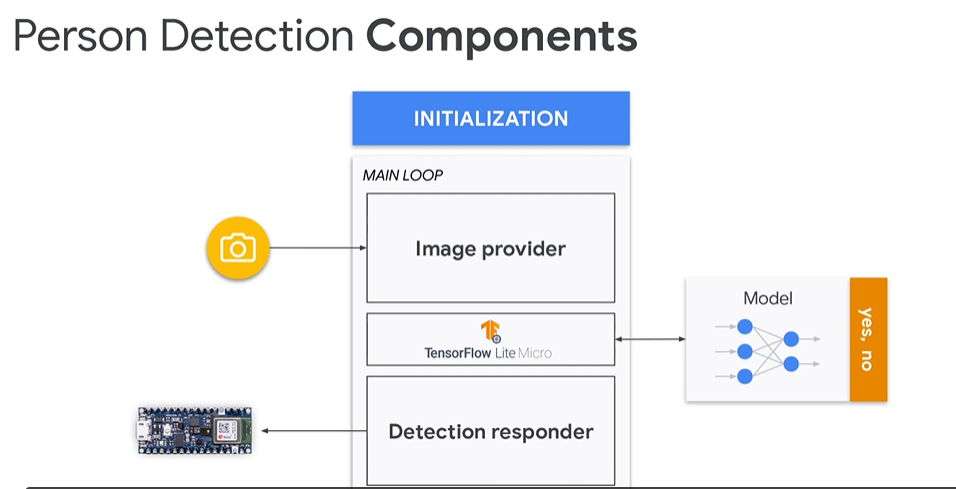
相较于KWS,其中的预处理和后处理过程较为轻松,因此相对的比较简单,参考示例代码中的person_detection即可。这里主要强调的其实是另一个东西,即多模态学习,同时处理视觉和听觉来共同处理。
在使用单个传感器进行处理时,其不需要考虑很多问题,但是当使用多个传感器时,由于MCU大概率不会支持多线程,因此无法同时的处理音频和视频数据,即视频或音频之间存在一定的延迟,所带来的问题就是在训练时我们所使用的模型是对齐的数据,而在推理时两者并不对齐,从而导致偏差而无法产生较好的效果,这也提醒了要注意一切由于嵌入式局限性或是系统复杂性所带来的较大差异。另一个要考虑的问题是多模型导致的内存短缺,在这种情况下,除了使用更好的硬件以外,另一种措施就是提取模型的公共部分并只存储一份
“手势识别”
另一个例子是进行手势识别,相较于传统的视觉听觉,嵌入式支持更加庞大的传感器生态,也因此可以应用于更多方面。但是对于传感器,仍有许多需要面对的问题。首先是数据的处理问题,其次随时间推移传感器性能下降从而导致性能下降出现问题
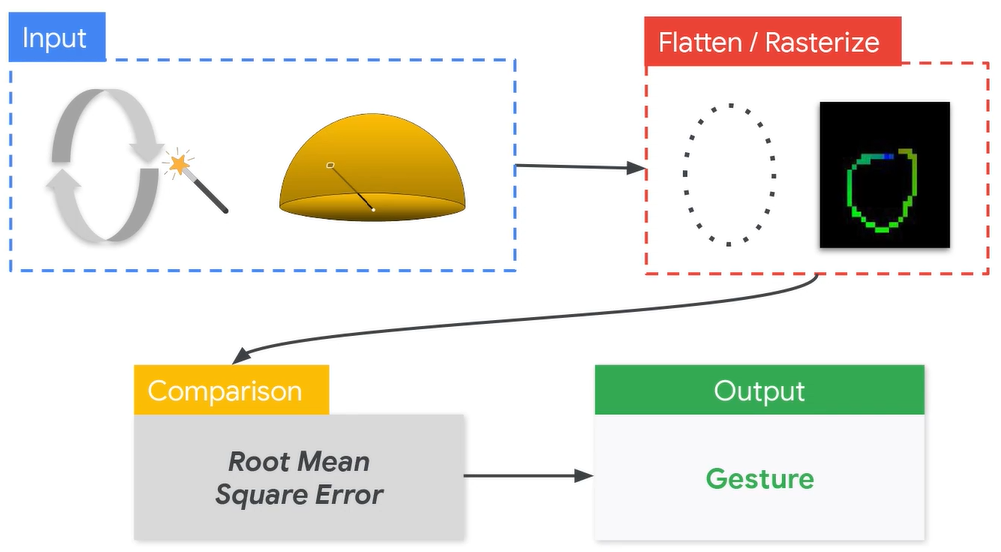
考虑到其中的步骤可能会有较大的误差,因此可以考虑使用ML方法,但是端到端的时候ML可能会由于模型过大而炸掉内存,所以合理的解决方案是将comparison中的平方根误差使用ML进行代替
关于安全性等多方面的考虑
这部分主要就是社论了
MLOps
MLOps指的是机器学习系统运营:

相较于前面的内容,这门课并没有很多的实践内容。这里提到了一个非常有趣的观点,即公司更喜欢T型的员工:
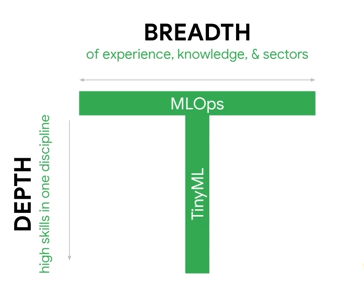
这部分也是社论。没什么多说的。
MNIST example
目标
尝试训练MNIST、在没有摄像头的情况下静态的读取FLASH中的数据并用于推理,或者通过在线数据进行处理和推理。主要步骤分为分析、训练、模型处理、部署、嵌入式端程序设计
分析
由于现在使用tensorflow进行TML较多,因此主要使用tensorflow进行模型的训练。对于嵌入式设备的程序设计尝试接触platformIO进行设计。所以首先是相关内容的部署和安装。
tensorflow
tensorflow仍然是深度学习方面的老大哥,其推广使用tensorflow lite以方便深度学习模型部署在手机和边缘设备上,且尽可能地缩小模型的尺寸和减少效果,这里使用的是tensorflow lite micro,即在tflite的基础上进行模型量化和平台适配得到的。tensorflow的安装自不必多说,除了tensorflow以外,还有一些需要安装的内容,在windows平台上需要安装xxd指令来将模型处理成十六进制文件方便嵌入式设备读取和推理。
platformIO
platformIO是新一代的嵌入式开发IDE,没错,是IDE,隔壁的乐鑫还没出来,arduino的手感依然糟糕的像粑粑,使用vscode勉强可以有较好的体验,但是库管理和项目开发上难免有些捉襟见肘。keli也是老中老的IDE了,所以还是决定接触一下新事物来进行开发。
platformIO是依托于vscode的,只需要在vscode中安装对应的扩展即可,之后找到左侧的小蚂蚁,创建一个新项目即可。后面会说明如何使用platformIO进行项目的开发和库管理。
模型训练
由于MNIST数据集早已是烂大街最基本的数据集,也不需要过多的数据预处理,因此直接就可以进行模型的训练流程,tensorflow也是学习了pytorch的模型构建方法,使得切换起来比较舒服(大部分API还是有很大的区别的)
模型的训练部分如下:
import tensorflow as tf
print("TensorFlow version:", tf.__version__)

from tensorflow.keras.layers import Dense, Flatten, Conv2D, AveragePooling2D
from tensorflow.keras import Model
from tqdm import tqdm

mnist = tf.keras.datasets.mnist

(x_train, y_train), (x_test, y_test) = mnist.load_data()
x_train, x_test = x_train / 255.0, x_test / 255.0

# Add a channels dimension
x_train = x_train[..., tf.newaxis].astype("float32")
x_test = x_test[..., tf.newaxis].astype("float32")

train_ds = tf.data.Dataset.from_tensor_slices(
    (x_train, y_train)).shuffle(10000).batch(32)

test_ds = tf.data.Dataset.from_tensor_slices((x_test, y_test)).batch(32)

class MyModel(Model):
  def __init__(self):
    super(MyModel, self).__init__()
    self.conv1 = Conv2D(3, 5, activation='relu')
    self.avgpool1 = AveragePooling2D()
    self.flatten = Flatten()
    self.d2 = Dense(10)

  def call(self, x):
    x = self.conv1(x)
    x = self.avgpool1(x)
    x = self.flatten(x)
    return self.d2(x)

# Create an instance of the model
model = MyModel()

loss_object = tf.keras.losses.SparseCategoricalCrossentropy(from_logits=True)

optimizer = tf.keras.optimizers.Adam()

train_loss = tf.keras.metrics.Mean(name='train_loss')
train_accuracy = tf.keras.metrics.SparseCategoricalAccuracy(name='train_accuracy')

test_loss = tf.keras.metrics.Mean(name='test_loss')
test_accuracy = tf.keras.metrics.SparseCategoricalAccuracy(name='test_accuracy')

@tf.function
def train_step(images, labels):
  with tf.GradientTape() as tape:
    # training=True is only needed if there are layers with different
    # behavior during training versus inference (e.g. Dropout).
    predictions = model(images, training=True)
    loss = loss_object(labels, predictions)
  gradients = tape.gradient(loss, model.trainable_variables)
  optimizer.apply_gradients(zip(gradients, model.trainable_variables))

  train_loss(loss)
  train_accuracy(labels, predictions)

@tf.function
def test_step(images, labels):
  # training=False is only needed if there are layers with different
  # behavior during training versus inference (e.g. Dropout).
  predictions = model(images, training=False)
  t_loss = loss_object(labels, predictions)

  test_loss(t_loss)
  test_accuracy(labels, predictions)

EPOCHS = 50

for epoch in tqdm(range(EPOCHS)):
  # Reset the metrics at the start of the next epoch
  train_loss.reset_states()
  train_accuracy.reset_states()
  test_loss.reset_states()
  test_accuracy.reset_states()

  for images, labels in train_ds:
    train_step(images, labels)

  for test_images, test_labels in test_ds:
    test_step(test_images, test_labels)

  print(
    f'Epoch {epoch + 1}, '
    f'Loss: {train_loss.result()}, '
    f'Accuracy: {train_accuracy.result() * 100}, '
    f'Test Loss: {test_loss.result()}, '
    f'Test Accuracy: {test_accuracy.result() * 100}'
  )
上面是一个模型的训练过程,其中要注意的是目前的训练还没有接触到数据集的封装阶段,即自定义dataset,这里知识简单的把数据维度变了之后丢进去。其他的基本还是几步走策略:数据集、模型、损失、优化器、训练。
模型压缩
实际上这里想要强调的重点是模型压缩的过程,这个过程是之前所没有进行过的。这里的代码对模型的压缩主要进行了两步(实际上也可以看做成都是压缩为了lite模型)
model.save(MODEL_SAVE_DIR) #模型存储

converter = tf.lite.TFLiteConverter.from_saved_model(MODEL_SAVE_DIR) #从模型设置一个converter对象
model_no_quant_tflite = converter.convert() #直接进行convert操作得到一个未经量化的模型,占用较大

open(FLOAT_LITE_MODEL_DIR,'wb').write(model_no_quant_tflite)

# 接下来的模型则是经过优化,关于模型的优化程度可以参考后面的图,这里使用的是MCU平台,因此需要将前面的操作尽可能的转化为INT8。具体的量化设置可以参考这里:https://www.tensorflow.org/lite/performance/post_training_quantization
converter.optimizations = [tf.lite.Optimize.DEFAULT]
#进行全INT8型转换时必须定义一个representative_dataset来校准整体的范围来保证数据量化正确。(这里并没有明确说明tf是如何进行量化的)https://www.tensorflow.org/lite/performance/quantization_spec
def representative_dataset():
  for i in x_test:
    t = tf.expand_dims(i,0)
    # print(t.shape)
    yield([t])
converter.target_spec.supported_ops = [tf.lite.OpsSet.TFLITE_BUILTINS_INT8]
converter.inference_input_type = tf.int8
converter.inference_output_type = tf.int8
# Provide a representative dataset to ensure we quantize correctly.
converter.representative_dataset = representative_dataset
model_tflite = converter.convert()

# Save the model to disk
open(QUANT_LITE_MODEL_DIR, "wb").write(model_tflite)


import os


def get_dir_size(dir):
  size = 0
  for f in os.scandir(dir):
    if f.is_file():
      size += f.stat().st_size
    elif f.is_dir():
      size += get_dir_size(f.path)
  return size

# Calculate size
size_tf = get_dir_size(MODEL_SAVE_DIR)
size_no_quant_tflite = os.path.getsize(FLOAT_LITE_MODEL_DIR)
size_tflite = os.path.getsize(QUANT_LITE_MODEL_DIR)

print("original size:{}\nno quant size:{}\nquant size:{}".format(size_tf,size_no_quant_tflite,size_tflite))

import numpy as np
# 测试函数,用于测试模型在压缩后的准确程度
def predict_tflite(tflite_model, img):
  img_array = tf.expand_dims(img, 0)

  # Initialize the TFLite interpreter
  interpreter = tf.lite.Interpreter(model_content=tflite_model)
  interpreter.allocate_tensors()

  input_details = interpreter.get_input_details()[0]
  output_details = interpreter.get_output_details()[0]

  # If required, quantize the input layer (from float to integer)
  # 这里的必须要通过函数来获得其中的参数来计算输入和推理的真值:real_value = (int8_value - zero_point) *scale
  input_scale, input_zero_point = input_details["quantization"]
  if (input_scale, input_zero_point) != (0.0, 0):
    img_array = np.multiply(img_array, 1.0 / input_scale) + input_zero_point
    img_array = img_array.astype(input_details["dtype"])

  # Invoke the interpreter
  interpreter.set_tensor(input_details["index"], img_array)
  interpreter.invoke()
  pred = interpreter.get_tensor(output_details["index"])[0]

  # If required, dequantized the output layer (from integer to float)
  output_scale, output_zero_point = output_details["quantization"]
  if (output_scale, output_zero_point) != (0.0, 0):
    pred = pred.astype(np.float32)
    pred = np.multiply((pred - output_zero_point), output_scale)

  predicted_label_index = np.argmax(pred)
  predicted_score = pred[predicted_label_index]
  return (predicted_label_index, predicted_score)
#%%
def run_tflite_test(model_file):
  correct_count = 0
  wrong_count = 0
  discarded_count = 0
  for i,j in enumerate(x_test):
      index, score = predict_tflite(model_file, x_test[i])
      if score < 0.75:
        discarded_count += 1
        continue
      if index == y_test[i]:
        correct_count += 1
      else:
        wrong_count += 1
        print("[%s] expected, [%s] found with score [%f]" % (y_test[i], index, score))

  correct_percentage = (correct_count / (correct_count + wrong_count)) * 100


  print("%.1f%% correct (N=%d, %d unknown)" % (correct_percentage, (correct_count + wrong_count), discarded_count))
#%%
run_tflite_test(model_no_quant_tflite)
#%%
run_tflite_test(model_tflite)

数据转换
将数据从图像转换为量化的数据并存储为json数据,这一步不是很难,主要是需要将数据根据转换规则进行处理即可,这里通过简单的将数据转换成列表并以字符串的形式从服务器发送以使ESP获取数据,而ESP获取数据则是通过处理字符串流的形式进行:
int8_t getData(signed char *input)
{
    if (WiFi.status() == WL_CONNECTED)
    {
        HTTPClient http;
        http.begin(serverPath);
        int httpCode = http.GET();

        char *buf = (char *)malloc(4096 * sizeof(char));
        String s = http.getString();
        s.toCharArray(buf, 4096);

        std::stringstream ss(buf);
        for (int i = 0; i < 784; i++)
        {
            int t;
            ss >> t;
            input[i] = t;
        }
        int8_t label = 0;
        while(ss)
        ss >> label;

        return label-48;
    }
    else
    {
        return -1;
    }
}
服务器端的代码就不做展示了,完成了上述处理之后只需要对推理部分进行轻微修改即可:
void loop() {
    int8_t label = getData(model_input->data.int8);
    if(label == -1)
        error_reporter->Report("failed to get vilid data!");
    TfLiteStatus invoke_status = interpreter->Invoke();
    if (invoke_status != kTfLiteOk) {
    error_reporter->Report("Invoke failed.\n");
    return;
    }
    int8_t* output = interpreter->output(0)->data.int8;
    int argmax=0;
    for(int j=0;j<10;j++)
    {
        if (output[j] > output[argmax])
            argmax = j;
    }
    Serial.printf("predicted label:%d\t true value:%d\n",argmax,label);
    delay(1000);
}
这里只是简单的将输出的最大值索引输出,并没有进行规格化处理,也没有涉及到其他相关内容。
结果
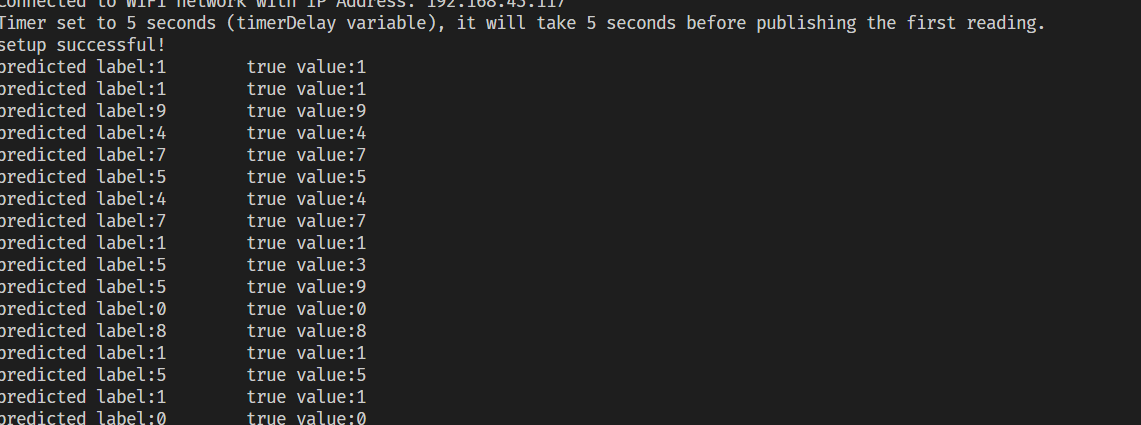
理论上的正确率大概在96%左右,但是这里没有考虑到程序的稳定性(有预测错误说明反而可疑说明程序没有问题)。
如果后续屏幕到了可能考虑屏幕实时显示一下当前的图像。
